


Creating a scalable Magento cluster
3 Jun 2015Magento is a class-leading e-commerce platform that enables businesses of all sizes to quickly and easily create an effective online sales presence. Magento utilises the common open source LAMP stack (Linux, Apache, MySQL and PHP) and so is fully supported on any of the Memset Linux servers.
This blog post will explain how to leverage several powerful Memset tools to create a clustered, scalable and load balanced Magento instance. A standard Magento installation will be run from a single server. This means that website data, the webserver and the database are all installed and run from a single machine. This configuration is fine for lightly loaded sites. However, as the site receives more traffic a single server can be quickly overwhelmed. Moving to a more powerful server will work for a while but becomes expensive and difficult especially if the work needs to be carried out rapidly. Furthermore, downgrading during less busy times is very difficult.
Separating these functions out to their own servers will result in an easily scalable infrastructure. Servers can be upgraded easily and new frontend servers added or removed as required.
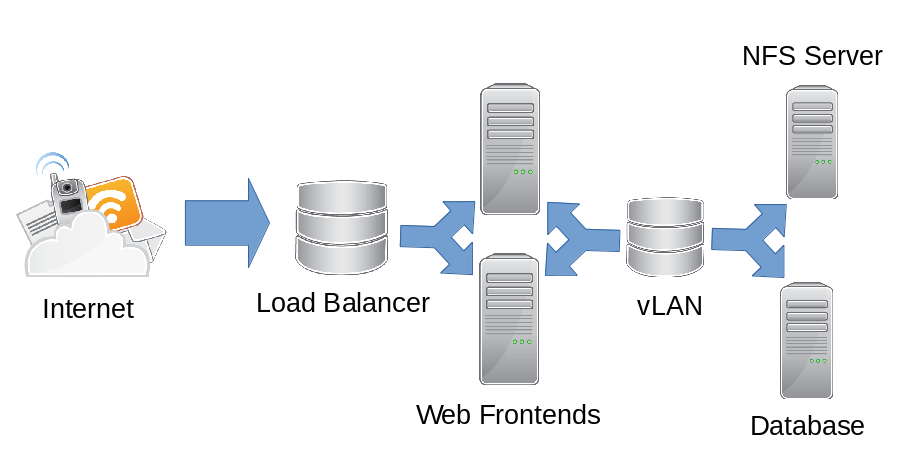
The cluster that we will configure will consist of four servers with the following roles:
Web frontends
These will run the webserver software, in this case Apache, that receives the incoming page requests, executes the PHP and issues the database queries and finally serves the pages back to the client browser. These servers contain no site data or configuration so can be added and removed as required.
Database server
The database is run on a dedicated server in order to maximise its performance and enable simpler upgrades.
NFS server
The website assets, i.e. the PHP and HTML files, images etc, are moved to their own server that all the web frontends mount locally as an NFS share. This arrangement enables a single installation of the website configuration to be utilized by many front-end servers. It also keeps the disk IO to a single server where it won't interfere with the database or web servers.
In addition to these servers the cluster will utilise the following Memset tools:
Memset Loadbalancer
The Memset load balancer receives the incoming website page requests and directs those requests to the one or more frontend webservers. This allows the incoming requests to be spread among the frontends avoiding any that are overloaded.
Memset vLAN
A vLAN is a private network internal to the Memset networking infrastructure which enables any servers attached to it to communicate via a high speed, low latency local LAN. The vLAN needed for this cluster is included with the load balancer.
Memstore
The Memset Memstore will be used to take and store a snapshot of a configured frontend server. This snapshot will then be able to be used later to re-image a new Cloud VPS to bring it online as a new front end in minutes should the web traffic spike and more webservers are needed to cope with the load.
The topology of the cluster is shown in the following image.
The following Memset products will be needed to reproduce this Magento cluster and will be assumed to be present for the rest of the post:
- Four Memset Cloud VPS running Ubuntu 14.04 LTS.
- Memset load balancer.
- Memset vLAN (included with the load balancer).
- Memset Memstore with sufficient space to take at least one one snapshot (3GB or more).
- Magento account for downloading Magento. A new account can be created at the Magento registration page.
Step 1: Configuring the vLAN
All the servers that are going to be a part of the cluster will need adding into the vLAN that was made available in your Memset account when the Memset load balancer was ordered. Only the web server frontends will be added to the load balancer but all the servers will need to be on the vLAN.
In order to add the new servers to the load balancer vLAN first browse to the vLAN management page here and click on Manage link to the right of the load balancer vLAN. On the page that follows click on the link Manage vLAN Hosts. Then select the servers you want to add by selecting them from the Add host drop-down list and adding them one at a time.
Note: Cloud VPSs will get re-booted when they are added in order for them to collect the new networking information.
Further information on managing and using vLANs can be found in the vLAN documentation.
Step 2: Configuring the load balancer
Once the servers are added to the load balancer vLAN then the web servers can be configured to accept traffic from the load balancers.
In order to add the servers to the load balancer cluster first navigate to the load balancer management page and click on the Manage link to the right of the load balancer.
If you do not yet have a service created you will need to create one and add the servers to it. Please refer to the load balancer and auto-failover section of the documentation for information on how to do this.
Do not enable the load balancer service yet as the cluster is not yet operational.
For further information regarding the Memset load balancer product please see the load balancer documentation.
Step 3: The NFS server
This server's job is to host all the web site's content (apart from the database) in a single location and make that data available to the web servers via an NFS mount. First, we will download and unpack the Magento installation and then we will make that data available as an NFS mount.
Downloading, unpacking and configuring the Magento installation archive
The required archive containing the Magento installation can be found on their download page. Please select the latest Full Release in tar.gz format and download it to your local computer.
You now need to upload this archive to the root directory ( /root/ ) on your server in order for the following commands to work. This can be done with the excellent and secure WinSCP using the root user and password.
We will unpack the Magento installation archive at /var/www/magento . This directory does not exist on a standard Ubuntu server install so it needs to be created.
The following will create the directory:
mkdir -p /var/www/magento
Next, we need to unpack the tar archive into the directory we just created:
tar -zxvf /root/magento_archive.gz -C /var/www/magento --strip-components=1
You will need to change the name of the Magento archive in the last command to the one you put on the server as its name is constantly changing as Magento provide updates. The correct ownerships must be applied to all the files and directories so that Apache will be able to access the site data:
chown -R www-data:www-data /var/www
and the permissions on the files and directories must be set to those recommended by Magento which are 700 for directories and 600 for files:
find /var/www -type d -exec chmod 700 {} \;
find /var/www -type f -exec chmod 600 {} \;
Finally, a small edit is needed to the .htaccess file for the site to better function in a cluster. The .htaccess file contains custom instructions to the webserver that pertain to the Magento installation.
We will use the nano text editor for all edits of text file where needed. It is first needs installing:
apt-get update
apt-get install nano
Information on using nano can be found here.
The .htaccess file is edited with the following command:
nano /var/www/magento/.htaccess
The line that needs changing is in the last section of the .htaccess which contains the text "FileETag" and looks like this:
############################################
## If running in cluster environment, uncomment this
## http://developer.yahoo.com/performance/rules.html#etags
     #FileETag none
The # symbol needs removing before FileETag so the section should look like the following after it has been edited
############################################
## If running in cluster environment, uncomment this
## http://developer.yahoo.com/performance/rules.html#etags
     FileETag none
Make /var/www/magento an NFS share
An NFS (Network File System) server is a means for a directory or device on one server to be mounted, that is joined to the local file system, on a remote server. Once the remote NFS directory is mounted on the local server it appears to be a normal part of the local file system and is treated as such by all locally running programs. Apache will happily serve the website from the remote NFS server as if it was installed locally.
The first thing that needs to be done is to install the NFS server package:
apt-get install nfs-kernel-server
In order to configure the NFS server you will need to get the private network address range of the load balancer vLAN. You can get this by first going to the vLAN management page and clicking on the Manage link next the load balancer vLAN. One the page that following in the Summary section the Private Network line will have a private IP that looks something like 10.0.1.0/24. This is vLAN IP range in CIDR format.
Once you have that IP range you need to add the following line in the /etc/exports file:
/var/www/magento 10.0.1.0/24(rw,sync,no_root_squash,no_subtree_check)
The file is edited with nano editor using the following command:
nano /etc/exports
Once that new line has been added the NFS server can be started with the following:
service nfs-kernel-server start
The Magento site data will now be available as an NFS shared directory to the webservers that are on the same vLAN range.
Step 4: The database server
This server must have MySQL installed and configured to listen only on the vLAN IP address. Then a new database must be created and configured which Magento will access and employ as the site database.
Installing and configuring MySQL
MySQL is installed with the following commands:
apt-get update
apt-get install mysql-server
During this installation process a MySQL password will be requested. This must be entered and securely stored as it will be required later.
Creating and configuring the Magento database
Now the Magento database needs creating by first logging into the MySQL server command interface:
mysql -u root -p
Here you will be prompted for the MySQL root password.
Now that you are logged in the new database needs to be created:
CREATE DATABASE magento;
Now a new user must be created, their password set and they must be given unrestricted access to the new magento database from a remote server on the vLAN. We will create a new user called "magento" which will be used to access the database also called "magento".
This is all done with the following command:
GRANT ALL PRIVILEGES ON magento.* TO 'magento'@'10.1.1.%' IDENTIFIED BY 'PASSWORD' WITH GRANT OPTION;
In the previous command the IP must be changed to the vLAN IP address range with the last digit replaced with a % symbol. Also PASSWORD must be changed to a new password for the magento user.
Type “exit” to quit MySQL and then enter the following command from the command line to test that the new database, user and password were all entered correctly:
mysql -u magento -p
You must enter the password you just set to the user "magento" that was just created. If you are logged back into the MySQL server interface then the database and user creation were successful.
Now MySQL must be configured to listen on the private vLAN IP address so that the web servers can access the database. This is done by editing the MySQL config file with the following command:
nano /etc/mysql/my.cnf
and modified the IP in the line that reads:
bind-address = 127.0.0.1
to the vLAN IP address of the database server e.g.:
bind-address = 10.0.1.5
This IP must be changed to the vLAN IP of this server.
Finally, the database server must be (re)started:
service mysql restart
Step 5: The webservers
We will use the Apache webserver for the Magento frontends because it is the recommended webserver for Magento and consequently has more documentation. Also, the performance difference between it and, for example, nginx is minimal due to the fact that PHP is the typical bottle neck on Magento instances.
The following command installs Apache, PHP5, PHP extensions and the nano text editor:
apt-get update
apt-get install apache2 php5 libcurl3 php5-curl php5-gd php5-mcrypt php5-mysql nano
The Apache rewrite module now needs enabling:
a2enmod rewrite
The php module mcrypt also needs enabling:
php5enmod mcrypt
And Apache needs restarting:
service apache2 restart
Now that Apache and PHP are installed and their basic configuration made we will mount the Magento site NFS directory so that we can then complete the Apache configuration and run the Magento installer.
Firstly we need to install the client NFS client:
apt-get install nfs-common
and create a directory to mount the remote Magento NFS directory. In this case we will mount it at /var/www/magento so that directory that needs creating is:
mkdir -p /var/www/magento
The NFS directory must be mounted automatically when the server is booted and the easiest way to do that is to add it to the fstab file. This is the system configuration file for mounting file systems and is run at boot time. The file can be edited with the following command:
nano /etc/fstab
The following line needs adding to the end of the /etc/fstab
10.0.1.4:/var/www/magento /var/www/magento nfs _netdev,auto,noatime,nolock,bg,nfsvers=3,intr,tcp,actimeo=1800 0 0
The IP 10.0.1.4 needs changing to the IP of the NFS server that was configured previously.
Note: take care editing this file as any mistakes can easily render the server non-bootable.
This configuration can be checked by using the following command to mount all the file systems listed in the fstab:
mount -a
If the command:
ls -la /var/www/magento
displays the content of the NFS share i.e. the Magento website files, then the fstab entry was successful.
Now Apache needs configuring to serve the Magento site. This is done by creating a new VirtualHost configuration file.
The following command will create and edit the needed config file:
nano /etc/apache2/sites-available/magento.conf
Copy and paste the following into the editor:
<VirtualHost *:80>
       ServerName      www.example.com
       ServerAdmin     user@example.com
       DocumentRoot    /var/www/magento
       ErrorLog        /var/log/apache2/magento.error.log
       CustomLog       /var/log/apache2/magento.access.log combined

<Directory /var/www/magento>
       AllowOverride All
</Directory>

</VirtualHost>
The following lines will need changing to suite your setup:
- ServerName – This line will need to be configured with the domain (with or without www's) that you want to use to access the site in a browser.
- ServerAdmin – This needs changing to your email address
The following command is always a good idea when editing Apache's config to ensure there are no errors:
apachectl configtest
It will check all its configuration and let you know if there are any errors.
If there are no errors then the site can be enabled and Apache reloaded:
a2ensite magento
service apache2 reload
Apache is now configured and running. This front-end server now needs enabling into the load balancer and the A record for the Magento domain name needs creating or modifying to point to the load balancer IP address.
Part 6: Loadbalancer and DNS configuration
First, you need to log into your Memset account and go to the load balancer overview page.
Once there you need to hit the Manage link in the Tools column. This will take you to the management page for the load balancer.
The frontend that has just been configured can be enabled via the Service Manager section.
The load balancer also now needs enabling. This is also done from the Service Manager page by checking the Enable button in the Service Definition section.
The load balancer is now online and the new frontend server configured to receive incoming connections.
An A record needs creating that resolves the domain name to the load balancer public IP address.
The load balancer public IP is labelled the Virtual IP on the load balancer configuration page. The needed A record will need to look something like:
shop.example.com IN A 1.2.3.4
Where “shop.example.com” is the domain/URL that you want to use to access the Magento site (it must be the same as the one specified on the ServerName line in the Apache configuration) and the IP 1.2.3.4 must be the Virtual IP for the load balancer.
If you need any additional information using the Memset load balancer configuration pages or the Memset DNS pages please refer to their documentation pages.
Memset Load Balancer Documentation
Part 7: Running the Magento installer
The installation process of Magento is initiated by visiting the site via the A record that has just been created with your browser. The installer will load automatically on the first visit.
The installation pages that will be encountered are as follows:
Licence
Accept the licence to proceed.
Localization
Select the appropriate location and currency for your Magento instance.
Configuration
This is where the cluster specific configuration must be enteredk. The configuration sections and options are as follows:
Database Connection
- Database Type - Select MySQL.
- Host - Here enter the vLAN IP of the database server along with the port number e.g. 10.0.1.4:3306
- Database name - magento
- Username - magento
- Password - The password you set for the magento database (not the MySQL root password).
- Tables Prefix - Leave blank.
Web access options
- Base URL - This is the URL that you want to use to access the Magento instance. The installer will use by default the one you used to access the installer.
- Admin Path - This is the name that will be used to access the Magento administration panel.
- Enable Charts - Leave checked if you would like charts to be displayed in your control panel.
- Skip Base URL Validation Before the Next Step - Check this as it will sometimes cause problems within the cluster setup.
- Use Web Server (Apache) Rewrites - Check this.
- Use Secure URLs (SSL) - Do not check this as we have not covered using SSL for the site.
Session Storage Options
- Save Session Data In - Select Database here.
This is a screenshot of the completed config page:

Create Admin Account
Personal Information Fill in the site administrators details here.
Login Information These are the login details that will be used to access the Magento administration panel.
Encryption Key Leave this blank.
One the page that follows you can fill in the optional survey if you want to but you must keep a copy of the encryption key printed at the bottom of the page.
The installation is now complete. You can now create/restore your new Magento shop.
Part 8: Taking a snapshot and using it for the other second frontend
The cluster is now configured and working but only has a single front end. Instead of manually configuring a new frontend server we will take a snapshot of the first, configured and working frontend and use that to re-image the second front end. This will simultaneously take a backup, test the process of re-imaging a server for use as a frontend and obviate the need to configure it by hand.
Taking a snapshot of a Memset Cloud VPS is very simple. All you need to do is first log into your Memset account and go to the management page for the configured frontend. This can be linked can be found on the Cloud VPS overview page.
Every Cloud VPS in the account has a Manage link on the right of their row. Click that and on the page that follows hit the link marked Server Snapshots and Re-Imaging link. On the left-hand side of the page select the Memstore account (if you have more than one) you wish to store the image in, put a note in the Comment box and hit the Take a Snapshot button.
Once the snapshot completes the image will be available to be used for all Cloud VPS in the account as an install image.
Re-Imaging the remaining frontend
Now all that remains is to re-image the remaining frontend server with the image we have just taken of the configured frontend. This is done by going to the management page for the target server and again going to the Server Snapshots and Re-Imaging. This time use the Re-Image right side of the page, select the Memstore account and then the image of the frontend server.
Note: remember that when re-imaging a server all non-backed up data on the will be lost *permanently*. Only proceed once you have made a copy of all important data on the server being re-imaged.
When the process is complete the server will be an exact copy of the original front end with only the networking config and hostname changed automatically. Due to the way the original frontend was configured it will work without any additional configuration being needed. The Apache and NFS processes will start automatically on boot so the new server will immediately have access to the site data, database and be able to serve the site.
Part 9: Adding the new frontend into the cluster
All that remains is to add the new frontend server into the Magento load-balanced cluster. This is done via the Service Manager page linked to from the management page for the load balancer. The new frontend server needs adding to the cluster ensuring to have the Enabled check box enabled when it is added.
The status of the cluster can be monitored via the Service Monitor page also linked to from the load balancer Manage page.
Conclusion
The load balancer cluster is now complete and functioning. Each subsystem employed by the Magento instance has been broken out to its own server, the incoming requests are being handled by the load balancer and additional frontends can be spun up rapidly to meet sudden demand.
However, it should be noted that the performance can be greatly increased by implementing full page caching. Magento performance tuning will be explored in a later blog post.